
Project Overview
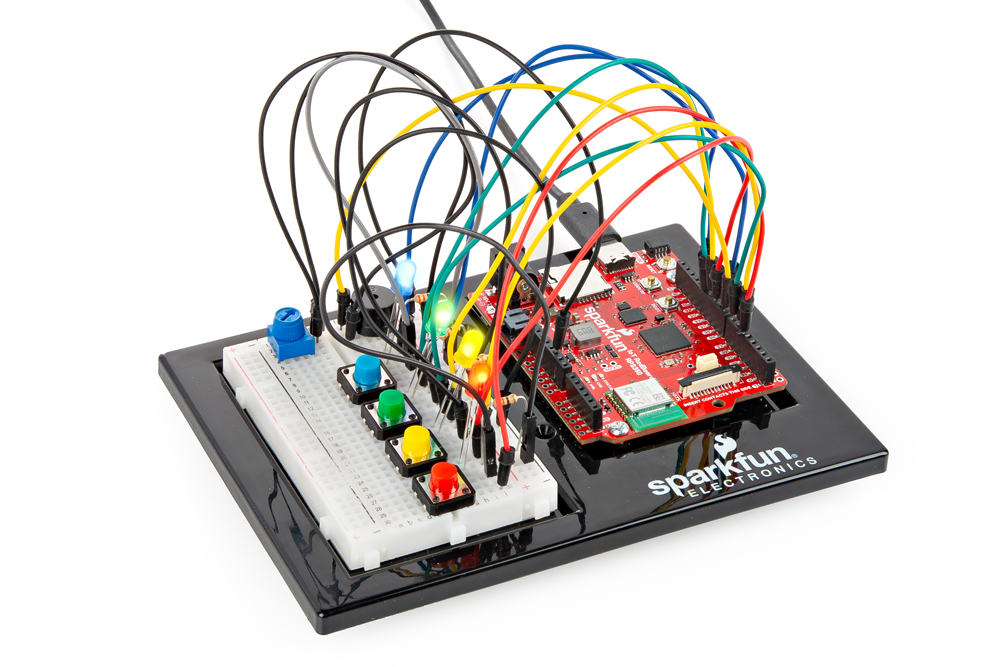
The Simon Says game uses LEDs to flash a pattern, which the player must remember and repeat using four buttons. The classic Simon game has been a hit since the 1980s. Now you can build your own!
Project 2 - Circuit C

New Concepts
For Loops
For loops repeat a section of code a set number of times. The loop works by using a counter (usually programmers use the letter “i” for this variable) that increases each loop until it reaches a stop value. Here’s an example of a simple for loop:
for i in range(5):
    print(i)
The for loop takes a list of values and will execute the code insde the loop for each value in the list. In this case, we create the list with the range() function. Since we specified “5” as the argument to the range() function, it will create a list of 5 numbers: 0, 1, 2, 3, and 4. Remember python is 0 indexed. So the code in the loop will run 5 times, once for each of these numbers. Each time the loop runs, the variable i will be set to the current number. The only code in our loop is the print() function. So when the entire loop runs, our print() function will print 0 1 2 3 4.
Measuring Durations of Time with ticks_us
The RedBoard has a built-in clock that keeps accurate time. You can use the ticks_ms() function of the built-in time module to see how many milliseconds have passed since the RedBoard was last powered. By storing the time when an event happens and then subtracting the current time, you can measure the number of milliseconds (and thus seconds) that have passed. To tell the difference between two times obtained with ticks_ms(), we can use ticks_diff(end_time, start_time).
Custom Functions
These functions perform operations that are needed many times in the program (for example, reading which button is currently pressed or turning all of the LEDs off). Functions are essential to make more complex programs readable and compact.
Hookup Guide
READY TO START HOOKING EVERYTHING UP? Check out the circuit diagram and hookup table below to see how everything is connected.
Circuit Diagram
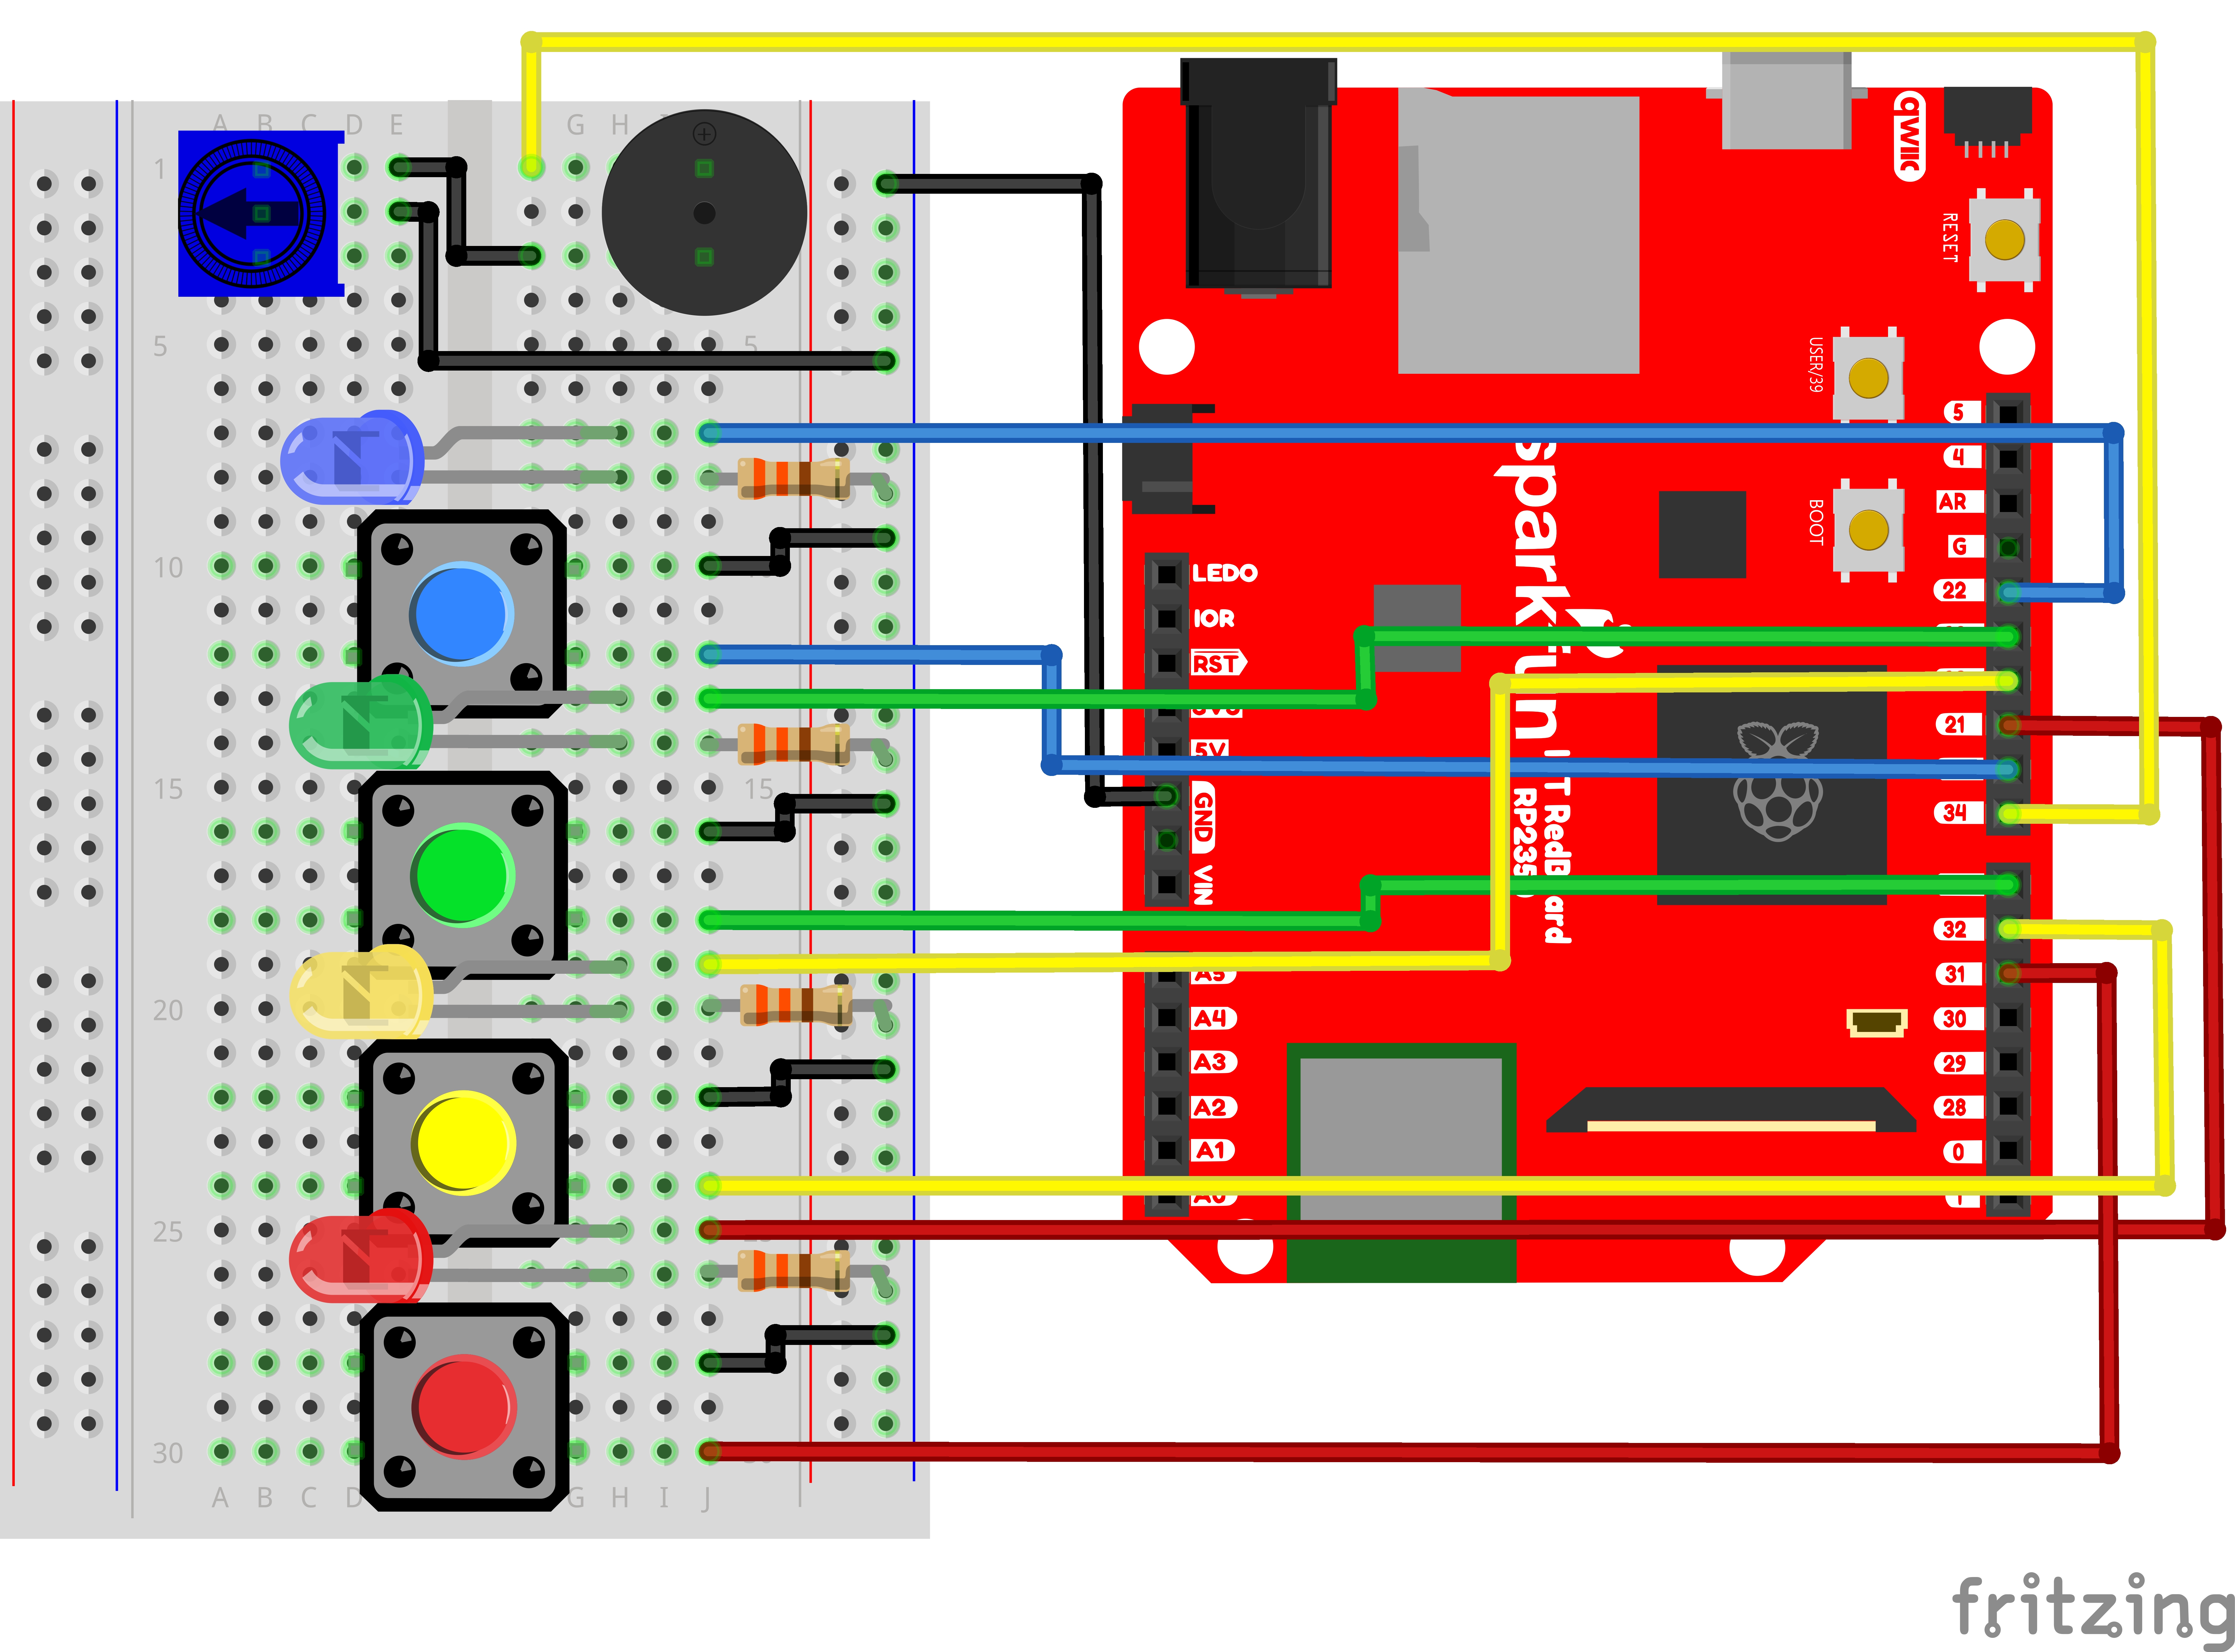
Note for Advanced Users: If you know how to read datasheets and schematics, you can also refer to the schematic below as an alternative.

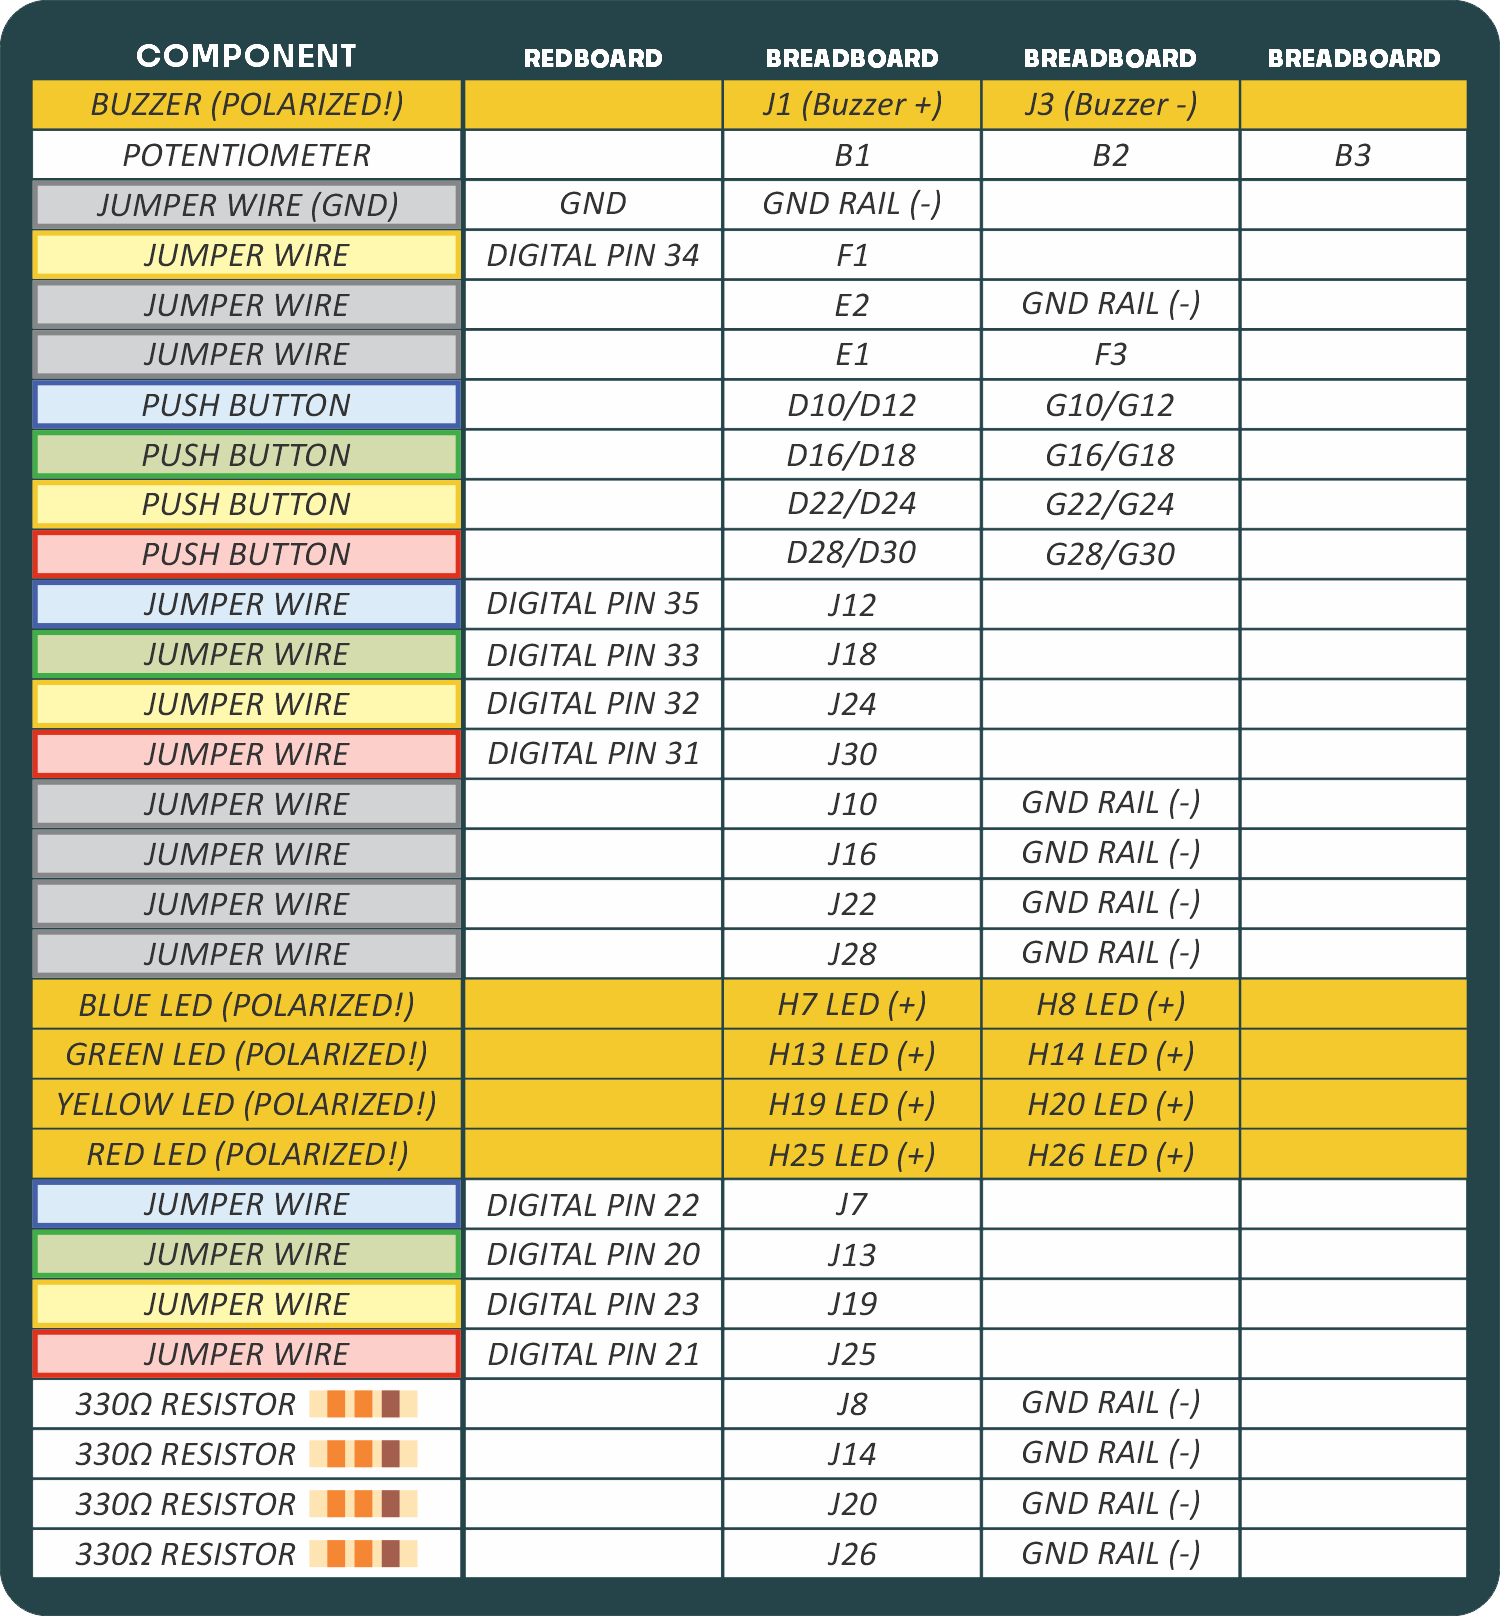
Hookup Table
Programming the RedBoard
The SparkFun RedBoard IoT is programmed using MicroPython and this project uses MicroPython commands to control the circuit. Before this is possible, a MicroPython tool is needed to communicate with the RedBoard.
Selecting a MicroPython Tool
Our suggested tool is the Thonny IDE. For instructions on how to install and use Thonny, check out our Thonny Guide.
The first step to enter commands on the RedBoard is to select a tool that allows direct interaction with MicroPython.
While a variety of methods exist to communicate with the RedBoard, the following tools are the most popular: Thonny, PyCharm and the command mpremote.
Once you select and install a tool, make sure your RedBoard is connected to your computer, and the micropython tool is connected to the RedBoard. Once connected, you should have access to the MicroPython REPL command line.
Remember that the source files for each SIK circuit are already on your IoT RedBoard RP2350 in the “sik_examples” folder. So if using the suggested Thonny tool, you can select the example for this circuit and run it directly with the green “run current script” button rather than executing lines individually.
Entering MicroPython Commands
Step 1 - Setup
Lets start by importing any of the libaries we plan on using and setting up our pins.
from machine import Pin # Allows us to use "Pin" to use code to interface with the pins on our board
from machine import PWM # Allows us to use "PWM" (pulse-width modulation) to control the brightness of our LED

blueKeyPin = Pin(35, Pin.IN, Pin.PULL_UP) # Create a Pin object for the first key on pin 35, set as input with pull-up resistor
greenKeyPin = Pin(33, Pin.IN, Pin.PULL_UP) # Create a Pin object for the first key on pin 33, set as input with pull-up resistor
yellowKeyPin = Pin(32, Pin.IN, Pin.PULL_UP) # Create a Pin object for the second key on pin 32, set as input with pull-up resistor
redKeyPin = Pin(31, Pin.IN, Pin.PULL_UP) # Create a Pin object for the third key on pin 35, set as input with pull-up resistor

blueLedPin = Pin(22, Pin.OUT) # Create a Pin object for the first LED on pin 25, set as output
greenLedPin = Pin(20, Pin.OUT) # Create a Pin object for the second LED on pin 26, set as output
yellowLedPin = Pin(23, Pin.OUT) # Create a Pin object for the third LED on pin 27, set as output
redLedPin = Pin(21, Pin.OUT) # Create a Pin object for the fourth LED on pin 14, set as output

buttons = [blueKeyPin, greenKeyPin, yellowKeyPin, redKeyPin] # Create a list of button pins
leds = [blueLedPin, greenLedPin, yellowLedPin, redLedPin] # Create a list of LED pins
tones = [262, 330, 392, 494] # Define the frequencies for the tones corresponding to the buttons

pwmSpeaker  = PWM(Pin(34), freq=0, duty_u16=0) # Create a PWM object on pin 34 with a frequency of 0Hz and an initial "on time" of 0 (off)
Step 2 - Create Constants
Constants are variables that are set to direct numbers that will not change throughout the life of a program. They are useful for numbers that we can tune before running a program to change it’s operation. Lets create some constants for how many rounds we want to take before the user wins and for the time limit to hit a button.
roundsToWin = 10 # Number of rounds needed to win
timeLimit = 2000 # Time limit for each round in milliseconds
Step 3 - Create Helper Functions
Next, let’s create the functions that we are going to use throughout our program to perform different useful tasks like flash the LEDs or check the buttons.
from random import randint # Import the randint function to generate random numbers
from time import sleep_ms # Import the sleep_ms function to pause execution for a specified number of milliseconds

# list to store the sequence that the player needs to remember
# we will start with a list of zeros and update it in the start sequence
buttonSequence = [0] * roundsToWin # Note how to initialize a list with a fixed size
gameStarted = False # Global flag to indicate if the game has started

# Flash LED
def flashLed(ledNumber):
    leds[ledNumber].high() # Turn on the LED
    pwmSpeaker.freq(tones[ledNumber]) # Set the frequency of the speaker to the corresponding tone
    pwmSpeaker.duty_u16(32768) # Set the duty cycle to 50% (half brightness)

# Turn all LEDs off
def allLedsOff():
    for led in leds:
        led.low() # Turn off each LED
    pwmSpeaker.duty_u16(0) # Turn off the speaker by setting duty cycle to 0

# Check which button was pressed
def buttonCheck():
    for i in range(len(buttons)):
        if buttons[i].value() == 0:
            return i # Return the "index" of the pressed button
    return 4 # Return 4 if no button is pressed (invalid index)

def timedTone(frequency, duration):
    pwmSpeaker.freq(frequency) # Set the frequency of the speaker
    pwmSpeaker.duty_u16(32768) # Set the duty cycle to 50%
    sleep_ms(duration) # Wait for the specified duration
    pwmSpeaker.duty_u16(0) # Turn off the speaker by setting duty cycle to 0

# Start Sequence
def startSequence():
    global buttonSequence # We need the "global" keyword to modify the variable outside this function

    for i in range(roundsToWin): # Loop through the number of rounds and fill up the button sequence
        buttonSequence[i] = randint(0, 3) # Generate a random number between 0 and 3 for the button sequence

    # Flash all of the LEDs 4 times when the game starts
    for i in range(len(tones)):
        # Play one of the tones
        timedTone(tones[i], 200) # Play the tone for 200 milliseconds

        # Turn all the LEDs on
        for led in leds:
            led.high()

        # Wait for at least 100 milliseconds
        sleep_ms(100)

        # Turn all the LEDs off
        allLedsOff()

        # Wait for at least 100 milliseconds
        sleep_ms(100)

# Win Sequence
def winSequence():
    # Turn all the LEDs on
    for led in leds:
        led.high() # Turn on each LED

    # Play the 1Up noise
    timedTone(1318, 150) # Play E6 for 150 milliseconds
    sleep_ms(175)        # Wait for 175 milliseconds
    timedTone(1567, 150) # Play G6 for 150 milliseconds
    sleep_ms(175)        # Wait for 175 milliseconds
    timedTone(2637, 150) # Play E7 for 150 milliseconds
    sleep_ms(175)        # Wait for 175 milliseconds
    timedTone(2093, 150) # Play C7 for 150 milliseconds
    sleep_ms(175)        # Wait for 175 milliseconds
    timedTone(2349, 150) # Play D7 for 150 milliseconds
    sleep_ms(175)        # Wait for 175 milliseconds
    timedTone(3135, 500) # Play G7 for 500 milliseconds
    sleep_ms(500)        # Wait for 500 milliseconds

    # Wait until a button is pressed
    pressedButton = 4 # 4 is an invalid index, used to indicate no button pressed
    while pressedButton == 4: # Keep checking until a button is pressed
        pressedButton = buttonCheck()
        sleep_ms(100)

    # Reset the game started flag
    global gameStarted # This allows us to modify the variable outside this function
    gameStarted = False # reset the game so that the start sequence will play again.

# Lose Sequence
def loseSequence():
    # Turn all the LEDs on
    for led in leds:
        led.high() # Turn on each LED

    # Play the 1Up noise
    timedTone(1318, 250) # Play E6 for 250 milliseconds
    sleep_ms(275)        # Wait for 275 milliseconds
    timedTone(1567, 250) # Play G6 for 250 milliseconds
    sleep_ms(275)        # Wait for 275 milliseconds
    timedTone(2637, 150) # Play E7 for 150 milliseconds
    sleep_ms(175)        # Wait for 175 milliseconds
    timedTone(2093, 500) # Play C7 for 500 milliseconds
    sleep_ms(500)        # Wait for 500 milliseconds

    # Wait until a button is pressed
    pressedButton = 4 # 4 is an invalid index, used to indicate no button pressed
    while pressedButton == 4: # Keep checking until a button is pressed
        pressedButton = buttonCheck()
        sleep_ms(100)

    # Reset the game started flag
    global gameStarted # This allows us to modify the variable outside this function
    gameStarted = False # reset the game so that the start sequence will play again.
Step 4 - Create the Game
Finally, lets put our functions together with some logic flow in order for our game to actually run!
from time import ticks_ms # Import the ticks_ms function to get the current time in milliseconds
from time import ticks_diff # Import the ticks_diff function to calculate the difference between two times

# Variable to keep track of the current round
roundCounter = 0

# Infinite loop to keep the program running
while True:
    if not gameStarted: # If the game has not started
        startSequence() # Start the game sequence
        roundCounter = 0
        sleep_ms(1500)
        gameStarted = True

    # each round, start by flashing out the sequence to be repeated
    for i in range(roundCounter + 1): # Go through the array up to the current round number
        flashLed(buttonSequence[i]) # Turn on the LED for that array position and play the sound
        sleep_ms(200) # Wait
        allLedsOff() # Turn all of the LEDs off
        sleep_ms(200)

    # then start going through the sequence one at a time and see if the user presses the correct button
    for i in range(roundCounter + 1): # For each button to be pressed in the sequence
        startTime = ticks_ms() # Record the start time

        while gameStarted: # Loop until the player presses a button or the time limit is up
            pressedButton = buttonCheck() # Every loop check to see which button is pressed

            if pressedButton < 4: # If a button is pressed (4 means that no button is pressed)
                flashLed(pressedButton) # Flash the LED for the button that was pressed

                if pressedButton == buttonSequence[i]: # If the button matches the button in the sequence
                    sleep_ms(250) # Leave the LED light on for a moment
                    allLedsOff() # Then turn off all of the lights
                    break # End the while loop (this will go to the next number in the for loop)
                else: # If the button doesn't match the button in the sequence
                    loseSequence() # Play the lose sequence (the lose sequence stops the program)
                    break # When the program gets back from the lose sequence, break the while loop so that the game can start over
            else: # If no button is pressed
                allLedsOff() # Turn all the LEDs off

            # Check to see if the time limit is up
            endTime = ticks_ms()
            timePassed = ticks_diff(endTime, startTime) # Calculate the time passed since the start
            if timePassed > timeLimit: # If the time limit is up
                loseSequence() # Play the lose sequence
                break # When the program gets back from the lose sequence, break the while loop so that the game can start over

    if gameStarted: # If the game is still running
        roundCounter += 1 # Increase the round number by 1

        if roundCounter >= roundsToWin: # If the player has gotten to the final round
            winSequence()

        sleep_ms(500) # Wait for half a second between rounds
What You Should See
The circuit will flash all of the LEDs and play a melody. After a few seconds, it will flash the first light in the pattern. If you repeat the pattern correctly by pressing the corresponding colored button, then the game will move to the next round and add another color to the pattern sequence. If you make a mistake, the loss melody will play. If you get to round 10, the win melody will play. Press any button to start a new game.
Coding Challenges
| Challenge | Description |
|---|---|
| Change the difficulty of the game | Change the difficulty of the game by changing how fast the player has to press each button or by increasing or decreasing the number of rounds needed to win. |
| Change the sound effects | Try changing the sequence of notes that play when you start, win or lose the game. |
| 2-Player mode | Ready for a real coding challenge? Try changing the code so that two players can play head-to-head. |
Troubleshooting
| Problem | Solution |
|---|---|
| One of the LEDs isn’t lighting up | Make sure your LED is flipped around in the right direction. If the LED still doesn’t work, try wiggling the resistor and the wires that connect to the LED. |
| The buzzer is too loud or too quiet | Turn the potentiometer to adjust the volume |
| One of the buttons isn’t working | Carefully check your wiring for each button. One leg of the button should connect to a pin on the RedBoard; the other leg should connect to the ground rail on the breadboard. |
| None of the buttons or LEDs is working | Make sure you don't have 5V and GND mixed up. Double check that you have a GND connection from the RedBoard to the GND rail on the breadboard. |
| Still not working? | Jumper wires unfortunately can go "bad" from getting bent too much. The copper wire inside can break, leaving an open connection in your circuit. If you are certain that your circuit is wired correctly and that your code is error-free and uploaded, but you are still encountering issues, try replacing one or more of the jumper wires for the component that is not working. |