
Project Overview
Want to create a DIY environmental monitor or weather station? You can use a small, low-cost sensor like the TMP36 to make devices that track and respond to temperature. In this activity you will also use the OLED screen to display sensor readings, a common use for OLEDs in electronics projects.
Project 4 - Circuit B

New Components
TMP36 Temperature Sensor
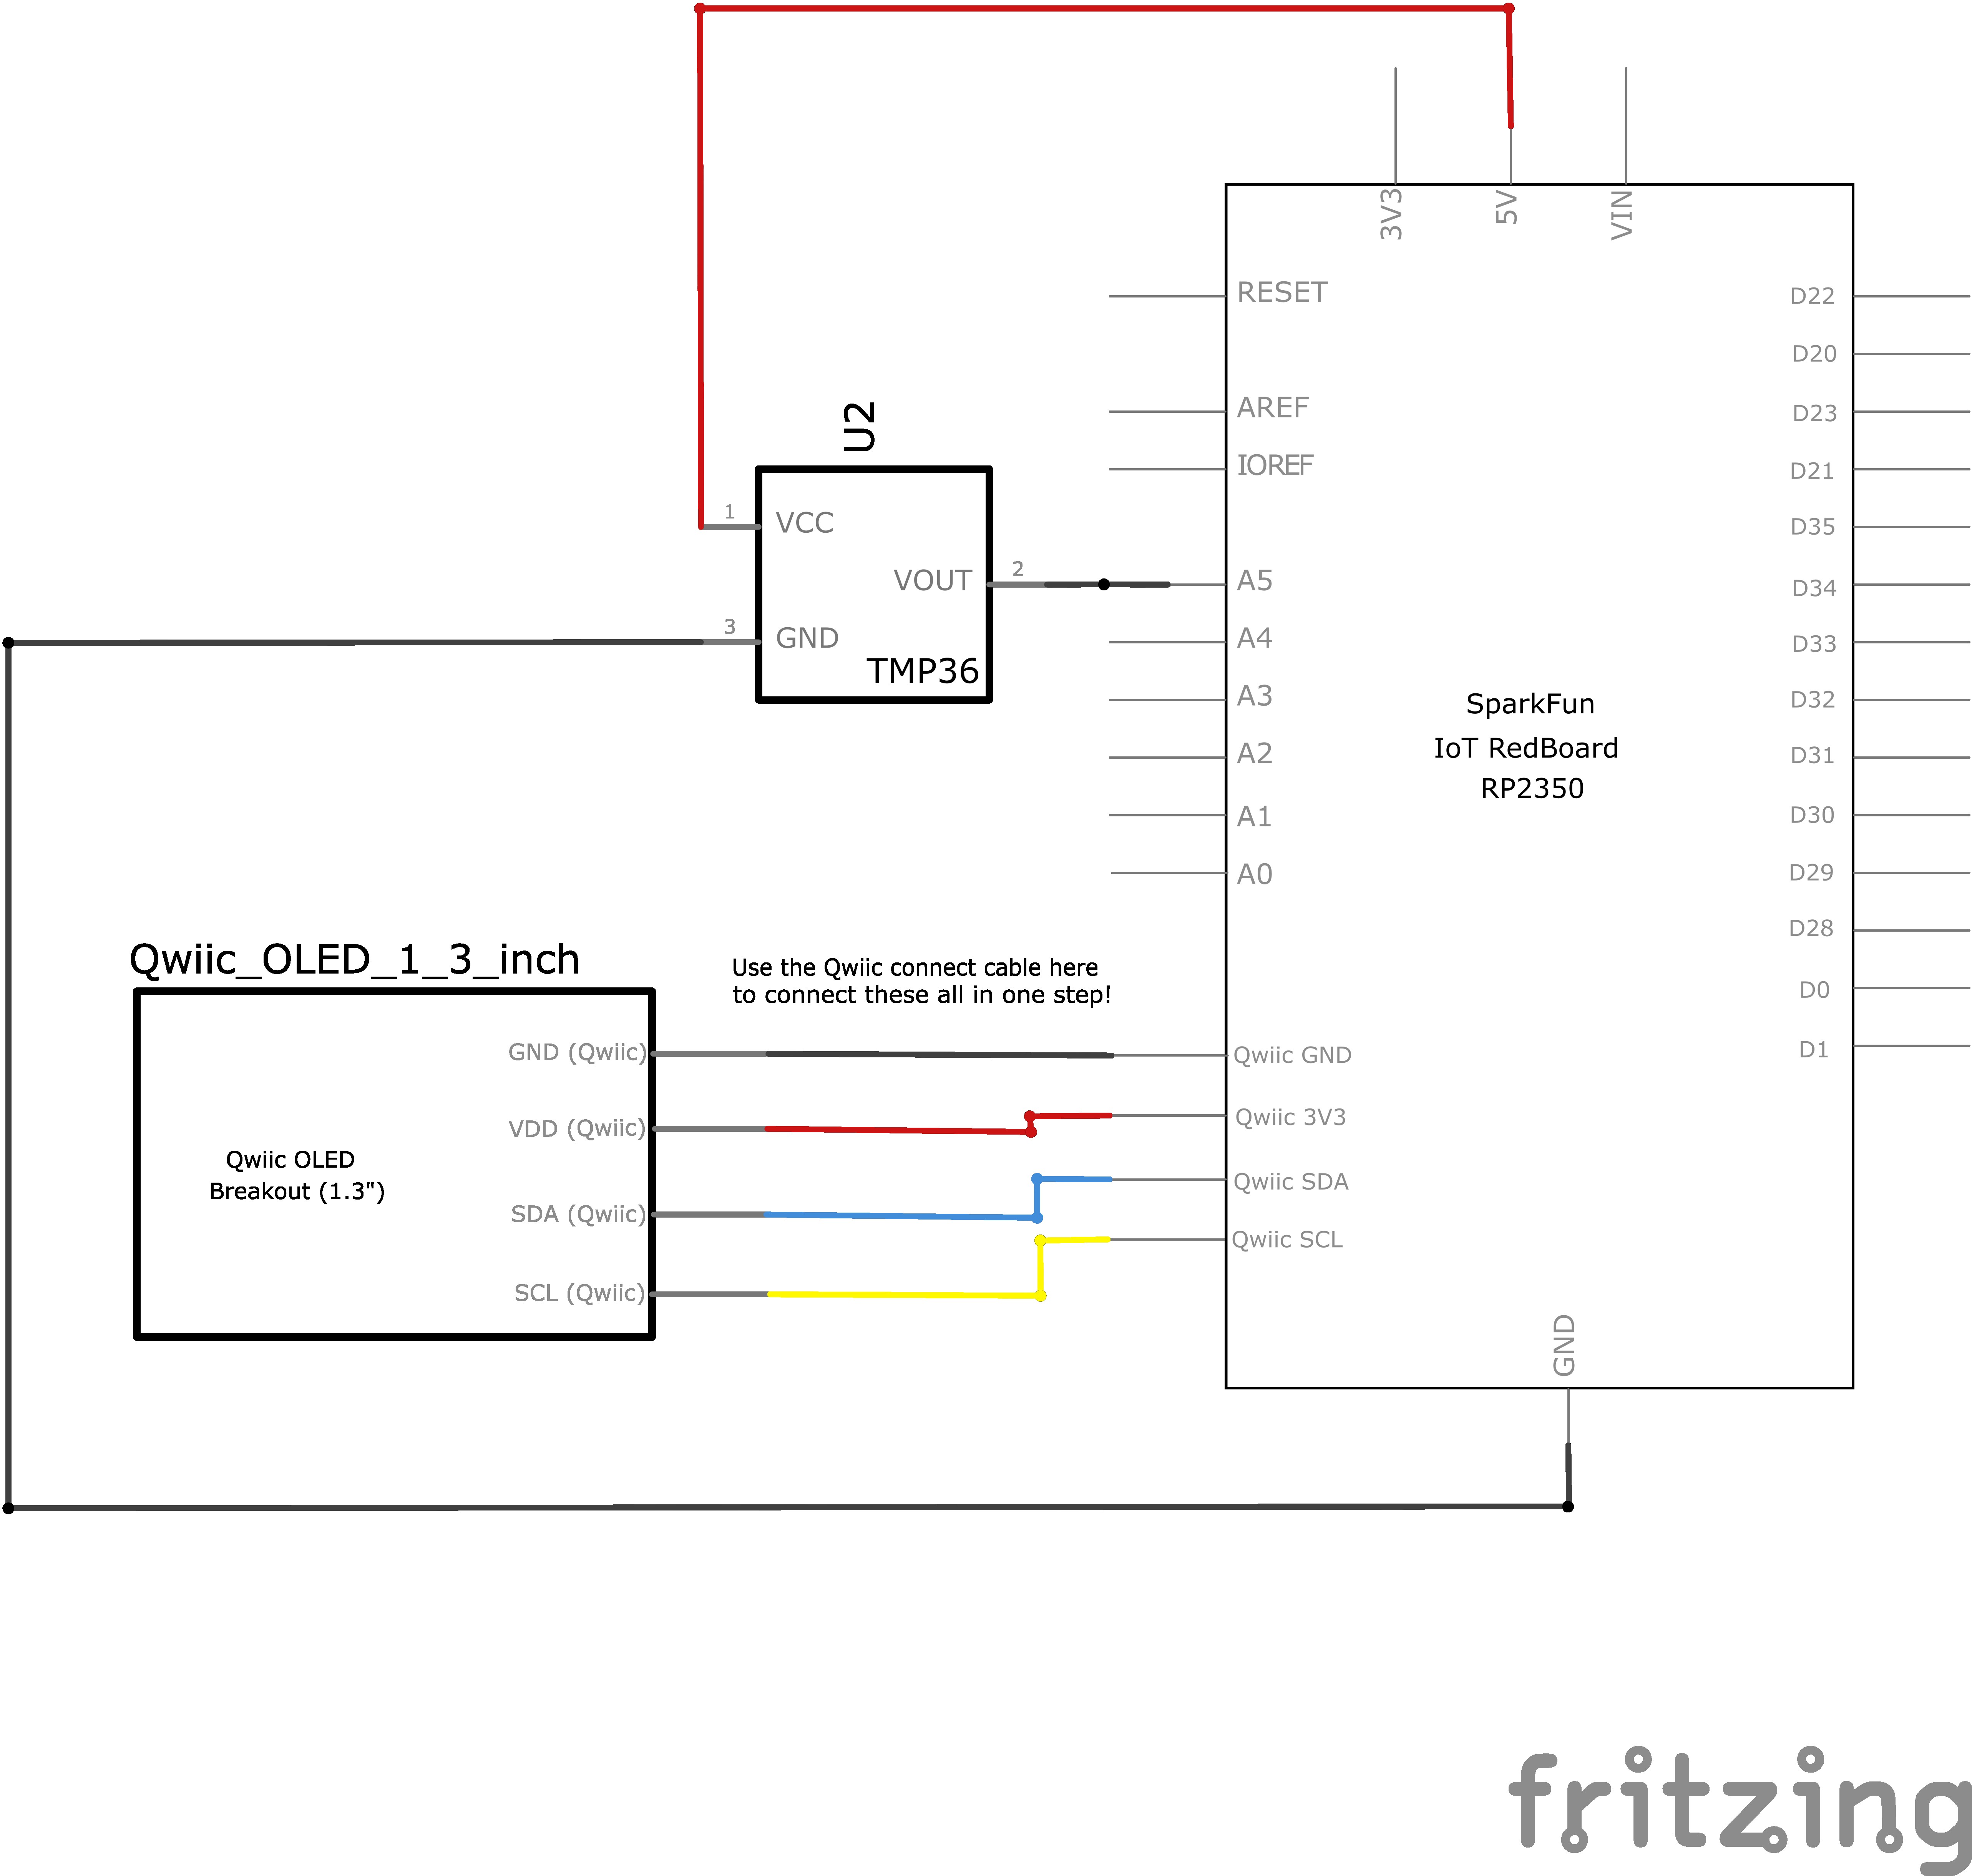
This temperature sensor has three legs. One connects to 3.3V or 5V, one to ground, and the voltage output from the third leg varies proportionally to changes in temperature. By doing some simple math with this voltage we can measure temperature in degrees Celsius or Fahrenheit.
New Concepts
Algorithms
An algorithm is a process used in order to achieve a desired result. Often, the information needed to create an algorithm lives in the part’s datasheet. This script uses a few formulas to turn a voltage value into a temperature value, making them all part of the larger temperature-retrieving algorithm. The first formula takes the voltage read on analog pin 0 and multiplies it to get a voltage value from 0V–3.3V:
voltage = tempSensor.read_u16() * (3.3 / 65535.0)We convert the analog “count” from the temperature sensor that gets returned by read_u16() to a voltage by multiplying by the maximum possible voltage (3.3 V) and dividing by the max number of counts (since read_u16() returns a 16-bit value that is 2^16 - 1 = 65535)
The next formula takes that 0–3.3V value and calculates degrees Centigrade:
degreesC = (voltage - 0.5) * 100.0The reason 0.5V is subtracted from the calculated voltage is because there is a 0.5V offset, mentioned on page 8 of the TMP36 datasheet. It’s then multiplied by 100 to get a value that matches temperature.
The last formula takes the Centigrade temperature and converts it to a Fahrenheit temperature using the standard conversion formula:
degreesF = degreesC * (9.0 / 5.0) + 32.0Together, these three formulas make up the algorithm that converts from the analog input counts to degrees Fahrenheit.
Hookup Guide
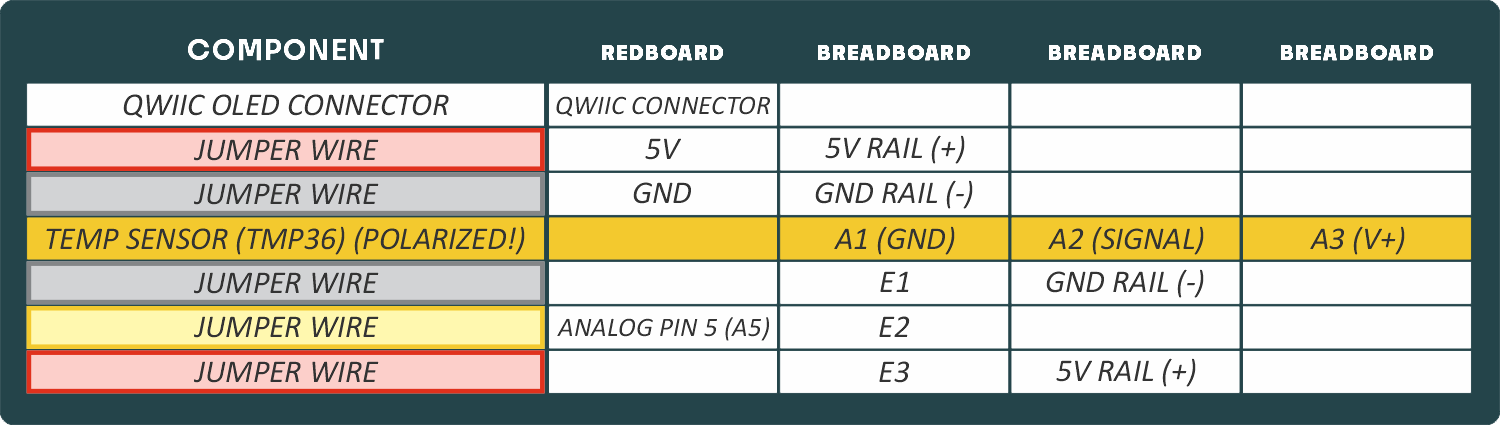
The temperature sensor is polarized and can only be inserted in one direction. See below for the pin outs of the temperature sensor. Pay very close attention to the markings on each side as you insert it into your circuit.
READY TO START HOOKING EVERYTHING UP? Check out the circuit diagram and hookup table below to see how everything is connected.
Circuit Diagram
Note for Advanced Users: If you know how to read datasheets and schematics, you can also refer to the schematic below as an alternative.
Hookup Table
Programming the RedBoard
The SparkFun RedBoard IoT is programmed using MicroPython and this project uses MicroPython commands to control the circuit. Before this is possible, a MicroPython tool is needed to communicate with the RedBoard.
Selecting a MicroPython Tool
Our suggested tool is the Thonny IDE. For instructions on how to install and use Thonny, check out our Thonny Guide.
The first step to enter commands on the RedBoard is to select a tool that allows direct interaction with MicroPython.
While a variety of methods exist to communicate with the RedBoard, the following tools are the most popular: Thonny, PyCharm and the command mpremote.
Once you select and install a tool, make sure your RedBoard is connected to your computer, and the micropython tool is connected to the RedBoard. Once connected, you should have access to the MicroPython REPL command line.
Remember that the source files for each SIK circuit are already on your IoT RedBoard RP2350 in the “sik_examples” folder. So if using the suggested Thonny tool, you can select the example for this circuit and run it directly with the green “run current script” button rather than executing lines individually.
Entering MicroPython Commands
Step 1 - Setup
Lets start by importing any of the libaries we plan on using and setting up our pins.
# The qwiic_oled driver module allows for control of SparkFun OLEDs.
# The QwiicLargeOled class is for the Large 1.3" OLED display in our SIK
from qwiic_oled import QwiicLargeOled
from machine import ADC # Allows us to use "ADC" (analog-to-digital conversion) to read from our analog pin
from machine import Pin # Allows us to use "Pin" to use code to interface with the pins on our board

# Define the OLED object that we will use
# Note how we don't have to provide the pins, the driver automatically selects the pins for the qwiic connector
myOLED = QwiicLargeOled()

# Create an ADC object for reading the temperature sensor
tempSensor = ADC(Pin.board.A5)  # A5 is the pin we connected the temperature sensor to
Step 2 - Reading Temperature
Now let’s write functions to read the temperature in both celcius and Fahrenheit using the “algorithm” that we discussed above.
def temperatureC():
    voltage = tempSensor.read_u16() * 3.3 / 65535.0 # Convert the raw reading to a voltage (0-5V)
    degreesC = (voltage - 0.5) * 100.0 # Convert the voltage to degrees Celsius
    return degreesC

def temperatureF():
    degreesC = temperatureC() # Get the temperature in Celsius
    degreesF = (degreesC * 9.0 / 5.0) + 32.0 # Convert Celsius to Fahrenheit
    return degreesF
Step 3 - Displaying Temperature on the OLED
Finally, lets read the temperature and display it on the OLED.
from time import sleep
myOLED.begin() # Initialize the OLED

# Infinite loop to continuously read the temperature and display it
while True:
    tempC = temperatureC() # Read the temperature in Celsius
    tempF = temperatureF() # Read the temperature in Fahrenheit

    # Clear the OLED display
    myOLED.clear(myOLED.ALL) # Clear OLED graphic memory.
    myOLED.clear(myOLED.PAGE) # Clear the processor's display buffer.

    # Print the temperature readings to the OLED
    # Print temperature in Celsius
    myOLED.set_cursor(0, 0) # Set cursor to the top-left corner
    myOLED.print(f"Temp C: {tempC:5}") # Print temperature in Celsius (formatted to 5 characters wide)
    myOLED.set_cursor(0, 10) # Move cursor to the next line (down 10 pixels)
    myOLED.print(f"Temp F: {tempF:5}") # Print temperature in Fahrenheit (formatted to 5 characters wide)

    myOLED.display() # Display the updated text on the OLED

    sleep(1) # Wait for 1 second before reading again
What You Should See
The OLED will show the temperature in Celsius and Fahrenheit. The temperature readings will update every second. An easy way to see the temperature change is to press your finger to the sensor or to breath on it.
Coding Challenges
| Challenge | Description |
|---|---|
| Display the temperature in degrees Kelvin | Try adding an equation so that the temperature is displayed in degrees Kelvin (you will have to look up the formula for converting from degrees Celsius or Fahrenheit to Kelvin). |
| Display a bar graph | By changing the code you can display the temperature as a bar graph instead of a number. |
| Display values from another sensor | You can swap out the TMP36 for a potentiometer, photoresistor or other sensor and display the new set of values. |
| Add an RGB LED | Add an RGB LED that changes color based on the temperature. |
Troubleshooting
| Problem | Solution |
|---|---|
| Sensor is warm or hot to the touch | Make sure that you wired the temperature sensor correctly. The temperature sensor can get warm to the touch if it is wired incorrectly. Disconnect your microcontroller, rewire the circuit, and connect it back to your computer. |
| Temperature value is unchanging | Try pinching the sensor with your fingers to heat it up or pressing a bag of ice against it to cool it down. Also, make sure that the wires are connected properly to the temperature sensor. |
| Values not printing to screen | If you see text but no temperature values, there could be an error in your code. |
You’ve Completed Circuit 4B!
Continue to circuit 4C to build a fun game incorporating your OLED.