
Project Overview
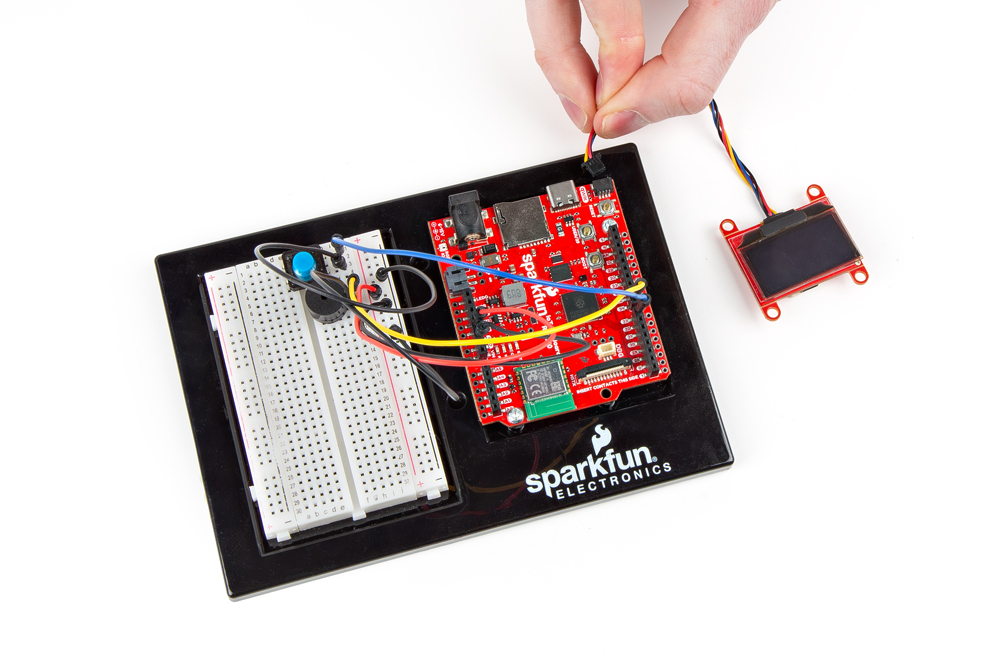
"DIY Who Am I?" is based on the popular Hedbanz game or HeadsUp! app. It's a fun party game in which a player holds an OLED screen to his/her forehead so that the player can’t see the word(s) that appear on the screen. Other players have to give hints, act out charades or make noises that will make the player with the OLED guess the word(s).
Project 4 - Circuit C

New Components
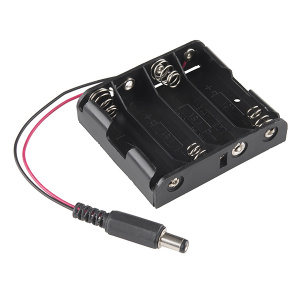
4xAA Battery Holder
Included in your kit is a 4-cell AA battery holder. The 5-inch cable is terminated with a standard barrel jack connector. The connector mates with the barrel jack on the RedBoard, allowing you to easily make your project battery powered.
New Concepts
Button Debounce
When working with momentary buttons, it is usually necessary to add button debouncing to your code. This is because the code that is meant to execute when the button is pressed may execute faster than you can press and release the button (microcontrollers are fast!). The simplest way to debounce a button is to add a small delay to the end of your code. This script adds a 500 millisecond delay at the end of the infinite loop to account for this. This simple addition will prevent a word from getting skipped when you press the button for the game.
“Saving” Code in MicroPython
MicroPython has a built-in way to “save” code to your device so it can run automatically without you having to manually start it. It does this by always running a special file called “main.py” in the root folder of the filesystem on your board every time that it is booted up. To save you the trouble of copy and pasting your code into this new file called “main.py” in the correct location, we have instead created a function that will do this for you called save_file_to_main. By passing the name of our project 4c file to this function, we can automatically save the example to the correct place so our code runs automatically when we have it hooked up to the battery pack without us having to run it ourselves:
from sik_utilities import save_file_to_main
save_file_to_main("sik_examples/project4_c.py")
Lists of Strings
In circuit 2A you used a list of characters to represent musical notes. In this program, you’ll want to make a list of strings. Strings use multiple characters to make words.
listOfStrings = [“Feynman”, “Sagan”, “Tyson”, “Nye”]Hookup Guide
Batteries are polarized. They have a positive end and a negative end. The battery holder has images indicating which end goes in which orientation for each cell.

Ensure all the batteries are inserted correctly before plugging the battery holder into the RedBoard.
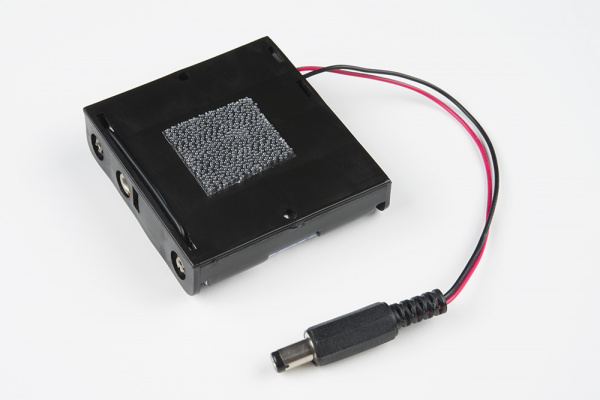
Battery Holder Attachment
To attach the battery holder to the breadboard baseplate, first cut two strips of Dual Lock that are roughly 1 inch x 1 inch each, or 2.5cm x 2.5cm. Remove the adhesive backing and attach one piece to the back of the battery holder.
Adhere the second piece to the bottom of the breadboard baseplate (directly in the middle is recommended, as this will come into play in Project 5).
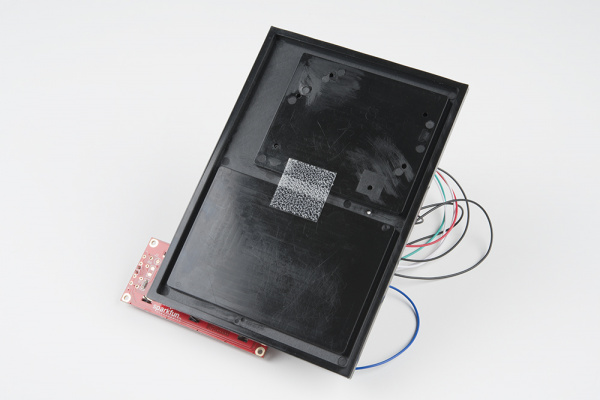
Last, press the battery holder to the baseplate so that the two pieces of Dual Lock snap together. Insert the batteries into the holder if you have not done so already. Remember that batteries are polarized and can only go in one way.
Remove the battery pack while building your circuit.
NOTE: If you would like, feel free to get creative with some of the dual lock tape, the binder clip, screws, or any other method you see fit to attach the OLED to your baseplate. This is not mandatory, but is somewhat nice for holding the game up to your head while playing. NOTE: DO NOT WASTE ANYMORE THAN A 1”x1” SECTION OF DUAL LOCK TO ATTACH THE OLED. MOST OF THE DUAL LOCK IS USED FOR THE ROBOT IN PROJECT 5.
READY TO START HOOKING EVERYTHING UP? Check out the circuit diagram and hookup table below to see how everything is connected.
Circuit Diagram
Note for Advanced Users: If you know how to read datasheets and schematics, you can also refer to the schematic below as an alternative.
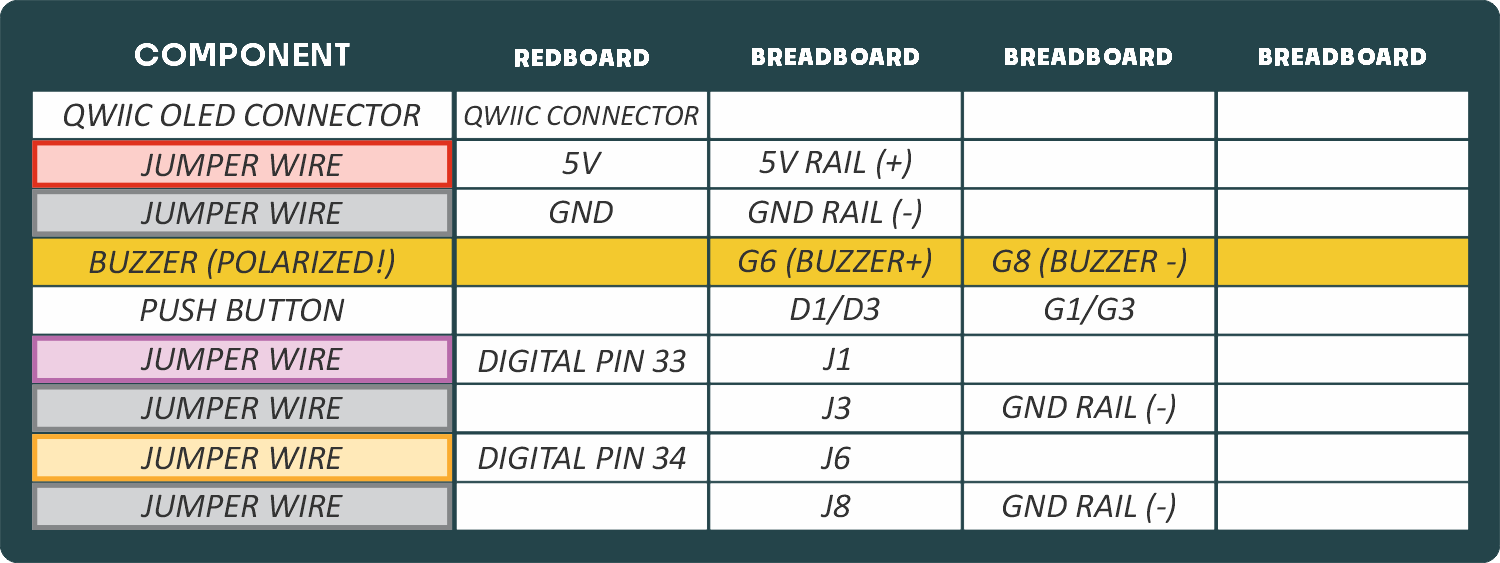
Hookup Table
Programming the RedBoard
The SparkFun RedBoard IoT is programmed using MicroPython and this project uses MicroPython commands to control the circuit. Before this is possible, a MicroPython tool is needed to communicate with the RedBoard.
Selecting a MicroPython Tool
Our suggested tool is the Thonny IDE. For instructions on how to install and use Thonny, check out our Thonny Guide.
The first step to enter commands on the RedBoard is to select a tool that allows direct interaction with MicroPython.
While a variety of methods exist to communicate with the RedBoard, the following tools are the most popular: Thonny, PyCharm and the command mpremote.
Once you select and install a tool, make sure your RedBoard is connected to your computer, and the micropython tool is connected to the RedBoard. Once connected, you should have access to the MicroPython REPL command line.
Remember that the source files for each SIK circuit are already on your IoT RedBoard RP2350 in the “sik_examples” folder. So if using the suggested Thonny tool, you can select the example for this circuit and run it directly with the green “run current script” button rather than executing lines individually.
Entering MicroPython Commands
NOTE: This is a special circuit that we will run from the battery pack. The save_file_to_main() lines below are actually all that is needed to save the correct example to your board such that it is run automatically. We will show descriptions of the other code lines as well though in case you are curious, but note that you DO NOT need to run these on your board.
from sik_utilities import save_file_to_main
save_file_to_main("sik_examples/project4_c.py")
Step 1 - Setup
Lets start by importing any of the libaries we plan on using and setting up our pins.
# The qwiic_oled driver module allows for control of SparkFun OLEDs.
# The QwiicLargeOled class is for the Large 1.3" OLED display in our SIK
from qwiic_oled import QwiicLargeOled
from machine import PWM # Allows us to use "PWM" (pulse-width modulation) to control the brightness of our LED
from machine import Pin # Allows us to use "Pin" to use code to interface with the pins on our board
from time import sleep_ms # Import the sleep_ms function to pause execution for a specified number of milliseconds
from random import randint # Import the randint function to generate random integers
from time import ticks_ms # function to get the current time in milliseconds

# Define the OLED object that we will use
# Note how we don't have to provide the pins, the driver automatically selects the pins for the qwiic connector
myOLED = QwiicLargeOled()

# Create a PWM object on pin 34 with a frequency of 0Hz and an initial "on time" of 0 (off)
pwmSpeaker  = PWM(Pin(34), freq=0, duty_u16=0)

# Create a Pin object for the button on pin 33, set as input with pull-up resistor
buttonPin = Pin(33, Pin.IN, Pin.PULL_UP)
Step 2 - Defining Constants
Now let’s define the constants that we’ll use in our game. Notice how we use a list of strings to make our “words” list of the items for people to guess in our game
words = [ "moose", "beaver", "bear", "goose", "dog", "cat", "squirrel", "bird", "elephant", "horse",
          "bull", "giraffe", "seal", "bat", "skunk", "turtle", "whale", "rhino", "lion", "monkey",
          "frog", "alligator", "kangaroo", "hippo", "rabbit" ]


# Create a list of 25 elements to store the order to display the words
# This will store indices into the words list, which will be used to display the words in a random order.
# We will initialize the list with -1 (which is an invalid index) until we have
# created the random order of words with our generate_random_order() function
# If you change the number of words in the words list, you will need to change the size of this list as well.
orderOfWords = [-1, -1, -1, -1, -1, -1, -1, -1,
                -1, -1, -1, -1, -1, -1, -1, -1,
                -1, -1, -1, -1, -1, -1, -1, -1, -1]

timeLimit = 15000 # Time limit for each word in milliseconds (15 seconds)
roundNumber = 0 # Keeps track of the current round number so it can be displayed on the OLED
Step 3 - Creating functions
Next, we’ll create some functions that will help us to build our game.
# Function for playing a timed tone from the speaker (buzzer)
def timed_tone(frequency, duration):
    pwmSpeaker.freq(frequency) # Set the frequency of the speaker
    pwmSpeaker.duty_u16(32768) # Set the duty cycle to 50%
    sleep_ms(duration) # Wait for the specified duration
    pwmSpeaker.duty_u16(0) # Turn off the speaker by setting duty cycle to 0

# Function to generate a random order of words
def generate_random_order():
    for i in range(len(orderOfWords)):
        # Generate a random index from 0 to the length of the words list
        random_index = randint(0, len(words) - 1)

        # Keep generating a new random index until we find one that is not already in the orderOfWords list
        # This ensures that each word will be used exactly once in the order
        while random_index in orderOfWords:
            random_index = randint(0, len(words) - 1)

        # Assign the random index to the orderOfWords list
        orderOfWords[i] = random_index

# Function to fully clear the OLED display
def clear_all_oled():
    myOLED.clear(myOLED.ALL) # Clear OLED graphic memory.
    myOLED.clear(myOLED.PAGE) # Clear the processor's display buffer.

def show_start_sequence():
    myOLED.set_font_type(1) # Set our font to font #1 (medium sized letters and numbers)
    clear_all_oled()  # Clear the OLED display
    myOLED.set_cursor(0, 0)  # Move the cursor to the top left corner
    myOLED.print("Category:")  # Print "Category:"
    myOLED.display() # Actually show what we've printed

    myOLED.set_cursor(0, 50)  # Move the cursor to the bottom left corner
    myOLED.print("Animals")  # Print "Animals"
    myOLED.display() # Actually show what we've printed

    sleep_ms(2000)  # Wait for 2 seconds

    clear_all_oled()  # Clear the display
    myOLED.set_cursor(20, 25)  # Move the cursor to middle(ish) of the screen
    myOLED.print("Get ready!")  # Print "Get ready!"
    myOLED.display() # Actually show what we've printed
    sleep_ms(1000)  # Wait for 1 second

    # Let's make our countdown nice and big by using font #3 (Large Number Font)
    myOLED.set_font_type(3)

    # Pro Tip: You can count DOWN with a for loop by passing -1 to the range function
    # This will count from 3 to 1, decreasing by 1 each time
    for i in range(3, 0, -1):  # Countdown from 3 to 1
        clear_all_oled()  # Clear the display
        myOLED.set_cursor(60, 10)  # Move the cursor to middle(ish) of the screen
        myOLED.print(str(i))  # Print the countdown number
        myOLED.display() # Actually show what we've printed
        sleep_ms(1000)  # Wait for 1 second

    # # Set our font back to font #1 (medium sized letters and numbers) after the countdown
    myOLED.set_font_type(1)

# Function to display when the player loses
def game_over():
    clear_all_oled()  # Clear the OLED display
    myOLED.set_cursor(0, 0)  # Move the cursor to the top left corner
    myOLED.print("Game Over")  # Print "Game Over"

    myOLED.set_cursor(0, 50)  # Move to the bottom row
    myOLED.print("Score: ")  # Print a label for the score
    myOLED.print(roundNumber - 1)  # Print the score (the score is equal to the previous level/round number)
    myOLED.display() # Actually show what we've printed

    # Play the losing fog horn
    timed_tone(130, 250)  # E6
    sleep_ms(275)
    timed_tone(73, 250)   # G6
    sleep_ms(275)
    timed_tone(65, 150)   # E7
    sleep_ms(175)
    timed_tone(98, 500)   # C7
    sleep_ms(500)

# Function to display when the player wins
def winner():
    clear_all_oled()  # Clear the OLED display
    myOLED.set_cursor(50, 20)  # Move the cursor to the top center of the screen
    myOLED.print("YOU")  # Print "You"

    myOLED.set_cursor(50, 40)  # Move to the bottom center of the screen
    myOLED.print("WIN!")  # Print "WIN!"
    myOLED.display() # Actually show what we've printed

    # Play the winning sound
    timed_tone(1318, 150)  # E6
    sleep_ms(175)
    timed_tone(1567, 150)  # G6
    sleep_ms(175)
    timed_tone(2637, 150)  # E7
    sleep_ms(175)
    timed_tone(2093, 150)  # C7
    sleep_ms(175)
    timed_tone(2349, 150)  # D7
    sleep_ms(175)
    timed_tone(3135, 500)  # G7
    sleep_ms(500)
Step 4 - Running the Game
Now let’s use our functions to actually run the game!
# Initialize the OLED display
myOLED.begin()  # Initialize the OLED display

generate_random_order()  # Generate a random order of words
show_start_sequence()  # Show the start sequence on the OLED display

print("Starting Program!")

# Variable for keeping track if the player has lost yet
playerHasLost = False

for i in range(len(orderOfWords)):
    clear_all_oled()  # Clear the OLED display

    myOLED.set_cursor(0, 25)  # Move the cursor to the start of the middle(ish) row of the screen
    roundNumber = i + 1 # the array starts at 0, but the roundNumber will start counting from 1
    myOLED.print(str(roundNumber) + ": ")  # Print the current round number
    myOLED.print(words[orderOfWords[i]])  # Print the word from the random order list
    myOLED.display() # Actually show what we've printed

    startTime = ticks_ms()  # Get the current time in milliseconds

    # Loop until the button is pressed
    while buttonPin.value() == 1:  # Wait for the button to be pressed
        roundedTimeLeft = int((timeLimit - (ticks_ms() - startTime)) / 1000)  # Calculate the remaining time in seconds

        # Display the time left in the lower right corner of the OLED
        myOLED.set_cursor(110, 50)

        myOLED.print("  ")  # Clear the previous time display
        myOLED.set_cursor(110, 50)
        myOLED.print(str(roundedTimeLeft))
        myOLED.display() # Actually show what we've printed
        sleep_ms(15)

        # Check if the time limit has been exceeded
        if ticks_ms() - startTime > timeLimit:
            playerHasLost = True # Player has failed to meet the time limit so let's take note of that so we know to play the failure sequence
            break # Break Out of our while loop

        # If the button was pressed, we will play a short beep sound
        if buttonPin.value() == 0:
            timed_tone(272, 30)

    # If the player has lost, let's not show them the other words, and break out of our for loop
    if playerHasLost == True:
        game_over() # Show the game over message
        break # Break out of our "for" loop

    sleep_ms(500) # Wait for half a second to "debounce" the button press

# If we reach here and the whole for loop has completed without saying the player has lost,
# let's play their victory sequence
if playerHasLost == False:
    winner()  # Display the winning message
What You Should See
The game will begin with a prompt telling you the category of words. Then it will run through a short countdown. When the first round starts, the word to be guessed will be displayed in the top left, and a countdown will be displayed in the bottom right of the OLED screen. Each time the button is pressed (before the timer expires) a new word will be displayed. If you win or lose, a short song will play and text will be displayed. Unplug and replug the battery pack or click the “RESET” buton on the RedBoard to restart the game.
Coding Challenges
| Challenge | Description |
|---|---|
| Change the time limit | Changing the time limit variable will change the difficulty of the game. |
| Change the words in the word list | Try changing the categories and words. The number of words in your words list must match the number of values in the orderOfWords list. |
| Change the winning and losing songs | By changing the tones in the winner() and gameover() functions you can change which song plays at the end of the game. |
Troubleshooting
| Problem | Solution |
|---|---|
| No sound is coming from the buzzer | Check the wiring from the buzzer. Make sure you are using the correct pin as defined in your code. You may add a potentiometer volume knob if you desire. |
| The button doesn't work or words are getting skipped before they are guessed | If the button isn't working, check your wiring. If words are being skipped when the button is pressed, increase the debounce delay found at the end of the loop. It should be 500 milliseconds by default. Increasing this number by tiny increments will help with this problem. |
You’ve Completed Circuit 4C!
You’ve Also Completed All of Project 4!
Continue to project 5 to learn about motors and build your own robot!